Back to SRD Index

Baptism of Fire
Introductory module for the Swords and Magic system by Giovanni Mizzi


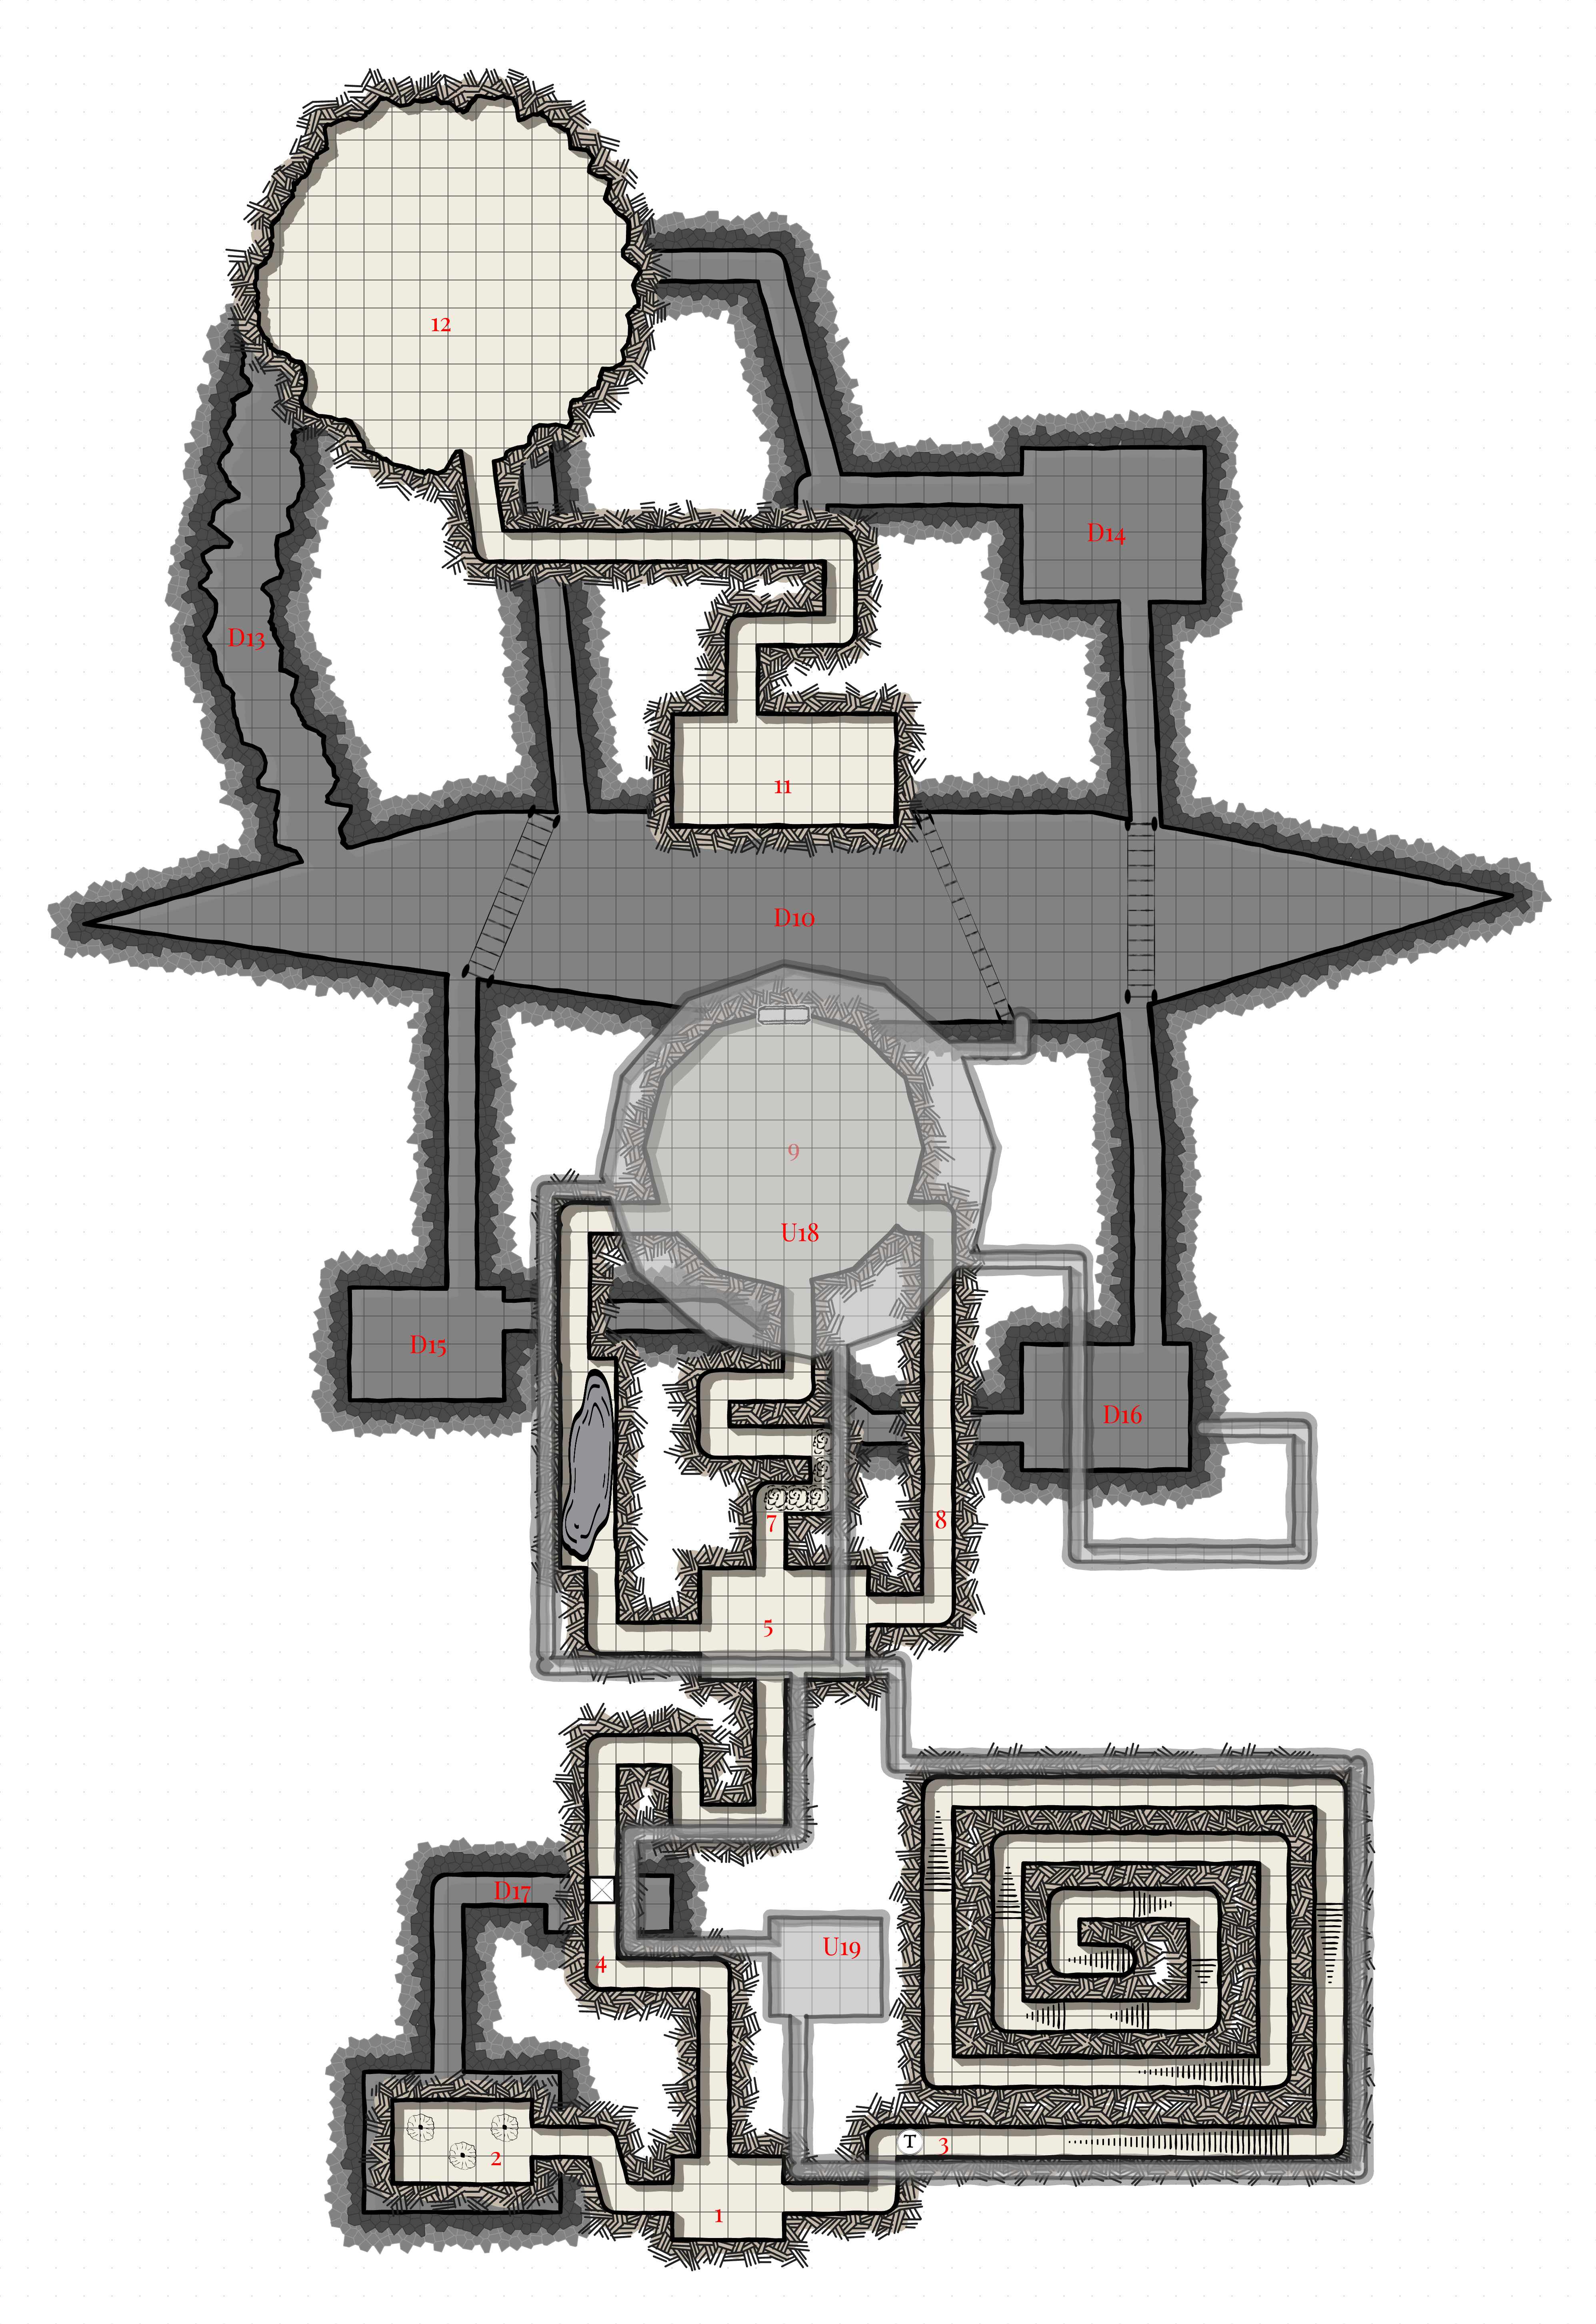
Map Copyright © 2008, 2016 Tim Hartin of Paratime Design. Used with permission. All rights reserved.


Adventure Summary

This adventure is a dungeon expedition where the characters must enter a kobold lair, recover a powerful artifact (the Flametongue), and return safely.

You can try this game using any adventure you want with a bit of work and adaptation. However, this book provides an original adventure that is already fully prepared and ready to be played.

You are advised to read the rules of the game first.

What You Need to Play

To run this adventure, you need the core rules of the game, available in the System Reference Document (SRD).
See the rules here.

GM Guidance

This dungeon is a big trap. It takes inspiration from Tucker's Kobolds and can be run at different power tiers. Here we propose a version suitable for the characters included in the adventure.

The entrance described here is only one of the many entrances to this lair, but it is the only one that is easily accessible to Medium-sized creatures. This is intentional. The kobolds want to lure the characters inside, where escape will be difficult. Their main goal is not to kill the intruders, but to enslave them.

There are three levels in the dungeon: the Middle Level is the trap level, the Lower Level (key D) is where the kobolds live and where prisoners are enslaved and eventually die, and the Upper Level (key U) is accessible only to kobolds and Small creatures. It is filled with narrow tunnels and a few chambers where the kobolds keep their most valuable possessions.

The Middle Level also contains a Dragon (of an age appropriate to the characters). The dragon believes itself to be the ruler of the complex, but does not realize (although it suspects) that the kobolds could easily bury it and dispose of it. For the kobolds, it is merely a dangerous pet guarding their treasure.

These kobolds are mean - meaner than the typical kobold, although they are otherwise typical in nature. Some of these kobolds can wield minor magic, but their power is fleeting and unreliable.

A note on monsters stat blocks

The stat blocks of the monsters are not the final version. They are intended just a starting point, and you can adjust them to your liking. The kobolds are meaner than the typical kobold, but their power is fleeting and unreliable. Just go with the flow. If you feel that a Kobold should have a magic missile, so be it. If you feel that a kobold should be able to cast a fireball, so be it. The Ability DCs are intended just for that, to give the GM a number for whaterver thing you think that monster can do.

For the same reason, you can see that Defences are shown with just a copoule of numbers. If you think that a specific monster, or kobold specifically, is better at Will rather than Reflex or Constitution, use the higher number for Will and the lower for Reflex and Constitution. Dodge defence is already included in the AC, so you don't need to add it again.

KEY TO THE DUNGEON
The squares in the map are 5 ft. and there is no light inside the complex, since the kobolds and the dragon have darkvision.

Tunnels in the Middle Level are 5 ft. wide and high, rooms are 10 ft. high.

START
You have traveled across the mountains for many days. You have followed a Kobold hunting party and have successfully identified the entrance to their lair. The opening is large enough for a large creature to fit in. Next to the entrance, laying all curled up with its back on the wall there is a little creature wrapped in fur. If they saw you, they did not show any sign of it.

The hunting party was actually aware of the party following them, and they have communicated so to the kobold sentinel at the entrance. The sentinel has a hidden wire they can pull to ring a bell inside the cave and alert of troubles coming.

The sentinel is crippled, and does nothing to hurt the characters. If they speak to them she tries to get some information, and is even helpful. The moment they talk, she already rang the bell and she accomplished her task.

KOBOLD SENTINEL
CR: 1/4
Role: Skirmisher
Type: Small Humanoid
Stats: HP 2, AC 13, Attack 18, Damage 4, Saves 15/11
Ability DCs: Primary 11, Secondary 8
Skills: Light Sensitivity (dazzled in bright sunlight)

If the PC attack the sentinel and she survives, she runs into corridor 3 and waits there for the characters. If she does not survive, read the following

You hear a frightened scream coming from inside the cave, right after the entrance, and see someone dashing inside.

If they follow him, they see that it's a kobold running towards the corridor in area 3.

Outside the cave, a few meters away from the kobold sentinel, there is a giant Lizard Chameleon. It stays still motionless (and the characters probably don't see it since it has exceptional camouflage) and it only hisses and attacks if the characters attack the kobold sentinel.

GIANT LIZARD (CHAMELEON)
CR: 3
Role: Lurker
Type: Large Animal
Stats: HP 30, AC 13, Attack 20, Damage 13, Saves 17/13
Ability DCs: Primary 14, Secondary 10
Skills:
  Camouflage: +10 to Stealth when motionless
  Prehensile Tongue: reach 15 ft., can pull creatures 10 ft. closer

1 - THE ENTRANCE
If the sentinel sounded the alarm, this room is empty. Otherwise two kobolds are stationed here guarding the entrance.

As the party approaches the entrance to the kobold lair, they're greeted by the sight of two kobolds. One is cooking snake meat over a small fire, while the other stands guard with a crude spear.

The entrance room, about 15 by 20 feet, is dimly lit by the dying fire and reeks of decay. Three tunnels lead from this chamber: one to the right, partially obscured by rubble, one to the left, emanating a foul stench, and one straight ahead, inviting the adventurers deeper into the kobold's domain.

If the kobolds are present they are surprised. They are outnumbered, so they try to flee, but not before cutting the characters way out by collapsing the trap right above the entrance by cutting a rope at the beginning of the tunnel leading to area 4.

KOBOLD
CR: 1/4
Role: Skirmisher
Stats: HP 2, AC 13, Attack 18, Damage 4, Saves 15/11
Ability DCs: Primary 11, Secondary 8
Skills: Light Sensitivity

TRAP: STONE BLOCKS FROM CEILING
Trigger: Manual (cutting rope)
Effect: Reflex DC 15, 3d6 bludgeoning damage. The cave entrance is occluded. It takes 5 people one hour to move away the rocks to be able to pass through.

You hear the noises of steps and whispers echoing in the tunnel on the right.

This is yet another trap. The kobolds want to draw the characters in area 3.

2 - THE SINKHOLES
This room is dark, humid and empty. You can hear the noise of dripping water, the floor is wet with you don't want to know what, and it stinks like urine, feces and death. There is nothing interesting for you here.

This is a possible way out from the trap in area 4 if the characters can't manage to be pulled up there in the tunnel.

3 - THE LONG TUNNEL
As your party progresses through the kobold lair, they come upon a tunnel adorned with remarkable bas-reliefs. These intricate carvings depict scenes of kobolds triumphing over demons, dragons, and giants, showcasing their prowess in battle and their ambition for conquest. The smooth walls narrate a tale of kobold ascendancy, with each panel telling a story of cunning strategies and hard-fought victories.

Beneath their feet, the floor is paved with meticulously laid tiles, a testament to the kobolds' attention to detail. As your party moves forward, the images on the walls serve as a reminder of the challenges they may face deeper within the lair, where the kobolds' determination and prowess are on full display.

This tunnel is the most dangerous trap of the whole complex. If the sentinel was alive, it run in here. Otherwise, one of the two kobolds in area 1 came this way. Whoever came here is sacrificing themselves, because if they manage to activate the trap, there is no way out and they are doomed.

Once the trap is activated (it's identical to the one in area 1) some smoke starts to develop from under the debris. It advances by 5 ft. per round. It obscures vision but even if it fills the whole tunnel it does not cause suffocation. It makes it easier for the kobolds to attack with surprise through the holes in the wall. They don't get advantage, though, because they cannot see the characters with the smoke.

SPEAR THROUGH HOLE TRAP
Effect: Atk +5, 1d6 prc damage. Automatic recharge. There are 1d4 consecutive holes. Roll to determine how many characters are attacked at the same time.

If the characters proceed, they find the tunnel going on forever, and getting always narrower and thinner and rougher and less decorated.

Characters can notice (Perception DC 15) that there are holes scattered around the walls and ceiling. The smoke seems to be aspirated in these holes (Perception DC 20). Through a smart ventilation system, this smoke goes then outside, and does not spread in the kobold tunnel.

The only way to get out is to blast their way out of the entrance, or break the walls in correspondence to the kobolds tunnels above them on the outer tunnel. Here, though, they would have to crawl while squeezing, and be subject to the attacks of multiple kobolds present in the tunnels.

Stone has a hardness of 8 (meaning it ignores the first 8 damage). The walls separating the characters from the kobold tunnel has 30 HP, while the collapsed entrance has 900 HP and is 5 ft deep. It takes to the full party one hour to free the entrance if they find a way to get rid of the smoke. Otherwise it takes 3 hours.

If they start doing this, the kobold may attempt the following: DM notes: This room is an opportunity to instill terror in your players. It should not debilitate them too much, and it might even prove a safe place to rest when they understand a few things (e.g. how to occlude the holes). It serves the purpose of showing how mean these kobolds are and how they toy with their preys. It must make the characters understand that they are not the predators here, they are the prey.

4 - THE PIT
If characters hesitate to proceed, let a couple of kobolds shoot at them.

This tunnel is still large enough for the party to go through it, even though it's only 5 ft. tall, so creatures other than small and dwarves might not find it very comfortable, despite not having any mechanical effect. It's very tortuous and it's difficult to find more than a few meters of a straight line to shoot. At some point, you find yourselves on a long corridor, and two kobolds lie a the end of it, shooting at you with their slings a soon as they see you.

If somebody charges at them and they are bigger than small size, they risk falling into the pit.

CONCEALED PIT TRAP
Effect: Perception DC 20 to notice. Reflex DC 15 to avoid. A creature that fails the saving throw falls for 20 feet in a frigid pond inhabited by a pudding. The pit is 15 ft. deep.

BLACK PUDDING
CR: 4
Role: Brute
Type: Large Ooze
Stats: HP 55, AC 17, Attack 19, Damage 20, Saves 17/13
Ability DCs: Primary 15, Secondary 10
Skills:
  Acid: dissolves organic material and metal quickly
  Split: slashing and piercing weapons cause it to split into two puddings
  Blindsight: 60 ft.

The pond connects to area 2 through the canal D17.

5 - THE THREEWAY
The characters probably arrive in this room with one or more black puddings following them.

The more you go inside, the more the stink of death and putrescence becomes. Here there is a bit more air, as this is the largest room you have encountered since you entered this complex. It looks like there is room for so much stuff. Three tunnels depart from this room, one in front of you, although with a smaller entrance, one to the left, and one to the right.

If the characters don't take a decision soon, the kobolds start to shoot at them through holes in the ceiling. These kobolds don't just shoot slings. Some of them also know some cantrips. They either shoot acid splashes, or ice rays or fire bolts. All deal only 1d3 damage, touch, but use the same attack of the sling.

6 - THE WATERWAY
This tunnel is still large enough for you to walk normally, but having to bend you back is not getting pleasant. You walk for a few feet, and right around the corner you see that the tunnel is closed. You splash your feet inside some water that is surprisingly clean. You can see that there's an underwater passage.

The pool is the home of a swarm of voracious fish capable of stripping the flesh from the bones of even large animals with astonishing speed.

SWARM OF PIRANHA
CR: 3
Role: Skirmisher
Type: Diminutive Animal (Swarm)
Stats: HP 15, AC 15, Attack 20, Damage 13, Saves 17/13
Ability DCs: Primary 14, Secondary 10
Skills:
  Swarm Traits: immune to single-target attacks, vulnerable to area effects
  Distraction: Fortitude save DC 14 or nauseated for 1 round

These Piranhas will attack anybody that comes into the water, unless they can be convinced not to do so.
They are just famished. After eating a creature they will not attack anymore. If the characters put the corpse of a kobold in the pool, they can go through it undisturbed.
If the piranha don't attack, the character simply swim through the pool. Otherwise, they need a DC 12 Athletics check to swim through the pool.

These sadistic kobols build a transparent glass wall so that they can see what happens in the pool, just to enjoy the sight of the preys being eaten by the Piranhas. Once underwater they can be seen laughing at the characters.

7 - THE GASWAY
The entrance of this tunnel is a bit lower than the others. Inside this tunnel, above the height of 4 feet, there is a poisonous gas that when inhaled make people faint. Nothing happens if the characters crawl or ar small in size, since they breathe at a lower height.

POISONOUS GAS
Effect: Fort DC 13. This poison does not have color or smell, nor taste. When inhaled, you risk becoming unconscious for 1 minute. After 1 minute you need to make another Fort saving throw. If you fail the second one, you become unconscious for 2d4 hours.

8 - THE THORNSWAY
This long corridor does not promise anything good. It looks like it might be easy to go forward, but impossible to go backwords. Hundreds of thorns come out of the wall pointing north, all coated in you don't want to know what. It looks like this passage is often used, since the floor is all consumed and there is a clear path.

Small creature can move easily through this passage going towards area 9, but if they go towards area 5 they consider it difficult terrain.

Medium creatures consider it difficult terrain going towards area 9, and if they go back towards area 5, in addition, they also suffer 1d4 slashing and piercing damage, no save.

When you consider it difficult terrain, you might move at full speed. Doing so, though, means you automatically inflicts yourself the thorn damage.

Once the characters are more than halfway towards the end, from some holes in the ceiling, 2 kobolds start to shoot at them.

9 - THE KILL ROOM
When you approach this room, you see that on the top of your head there is a net containing rocks and debris.

Let the players decide what they want to do with this information.

This room is by far the biggest and most worked that you have encoutered. It's circular, 50 feet in diameter, with a tall hemispherical ceiling 15 feet high. On the opposite side of the room, an imposing wooden door seems to lead to some important room. The ceiling of the hall is dotted with a hundred holes the size of a fist.

As soon as somebody enters the room, it's clear that there are many kobolds in this room. They are whispering and snickering and cannot contain their excitement. When everybody is in the room, the kobolds collapse the entrances, trapping the characters in this room.

As this happens, they started attacking. They have nearly full cover, but it's very easy for them to attack the characters anywhere in the room.

There are 10 kobolds, 4 of which attack with arrows dealing 1d6-1 damage, 4 with ray of frost, and 2 attack using bottles of acidic fire (touch +3, 1d4 fire + 1d4 acid, and 1d4 fire for the next 2 rounds unless the acid is not removed - a prestidigitation might do the trick).

The kobolds have nearly total cover. Consider them having 3/4 cover and attackers attack with disadvantage. They can still be seen, so magic missile still hits automatically.

The door can be smashed open with a DC 18 Athletics check. There are no door knobs, or locks on the door, and the door has 10 hit points, ignoring the first 5 from each attack (unless attacked with an adamantine weapon).

D10 AND 11 - CREVASSE
The door from area 9 opens on a crevasse. The door is 30 feet from the bottom. If any creature is trying to smash the door open, make them roll a DC 13 Reflex saving throw to avoid fall in the crevasse.

The door opens into the void. There is no floor after it. Looking up you can see the sky, this cave is open to the world. As soon as the door is open, you hear cheering screams some 30 feet in front of you. On a platform about 10 feet below the door on the other side, a dozen of kobolds looks very happy to see you. Some of them are on top of a loaded ballista, and they shoot at the first character they see.

BALLISTA
Effect: +3, 3d6 prc damage. It takes 4 rounds a crew of 4 goblins to reload it.

The characters can start strying to climb the wall, which is covered in ropes and plants that make it easy to climb. In the meantime, though, dozens of kobolds are shooting at the characters.
Furthermore, they notice that right 5 feet away from the door, a circle of fire surrounds them.

Going through the fire circle causes 1d6 fire damage. After the first fire circle, there is another one 5 feet away.

Falling causes 1d6 damage per 10 feet, and you fall prone.

At the bottom of the crevasse there are 10 zombies of different creatures, some humans, some dwarves, some elves, some gnomes, some halflings, you choose. Furthermore there is also 1 ogre zombie. Remember that the zombies can either attack or move. They are all spread around the crevasse, so not more than 2 or 3 will be in the immediate vicinity of any character falling.
As soon as somebody is in the crevasse (even a kobold), the zombies will go there to eat.

ZOMBIE (MEDIUM)
CR: 1
Role: Brute
Type: Medium Undead
Stats: HP 20, AC 15, Attack 17, Damage 10, Saves 15/11
Ability DCs: Primary 12, Secondary 9
Skills: Single Actions Only (move or attack only)

OGRE ZOMBIE (LARGE)
CR: 3
Role: Brute
Type: Large Undead
Stats: HP 40, AC 17, Attack 19, Damage 16, Saves 17/13
Ability DCs: Primary 14, Secondary 10
Skills: Single Actions Only (move or attack only)

When the characters go far away from the door, describe what they see.
Around the door you entered the crevasse cave from, you see two big concentric cicrles of fire. They look like a target. It is a target for the ballista. The kobolds were just playing with you.

Apart from the kobolds on the platform in area 11, there are three rope bridges with 4 kobolds on each. They too are looking at the show, and will occasionally shoot some arrow.

To make the scene cinematic, you can describe many arrows and spells being shot at each character, at least 3 per round. For each character roll a d20. If they roll 3 or less (or 2 or less for a particularly armored character) they are hit by something. If they roll 1 they are hit by 2. You can then roll a d4 and depending on the result you roll the damage:
  1. arrow, 1d6 piercing damage
  2. sling bullet, 1d3 bludgeoning damage
  3. ray of frost, 1d3 cold damage
  4. acid splash, 1d3 acid damage
12 - DRAGON'S LAIR
This room is home for the dragon Zog. Zog is a red dragon wyrmling that hatched not too long ago and and at first it was just the kobolds's pet, protecting their treasure. As it grows, though, it's starting to understand its own power, and claimed this room as its own, including the treasures included.

The kobolds were able to stash some treasure in room U19, away from the dragon, but it claimed the flametongue sword for itself.

You enter a circular cave that is dimly lit. You can see somewhere on the far side of the cave a pile of coins, and many other precious items and stones and gems. On top of those lays a sword on fire, which is the only source of light in the room. Many stalagmites and piles of rock are spread around the room.

Unless the characters find a way to enter undetected, Zog notices them and hides in the pile of treasure. He rolled Stealth 21, so the characters don't notice it unless they roll Perception higher than that. Remember that Zog has blindsense, and can perceive even unseen creatures.
Zog knows he's a little dragon, but he is already full of himself. He thinks he can take the characters, and attacks if he can hit many of them with his breath.

If he perceives the characters are around but cannot see them, he tries to talk to them to understand what they want and if he can be of help to them. If the characters mention the flametongue sword, he gets really upset and attacks.

In realtiy, Zog is the hatchling of an Adult Red Dragon named Maicalepre. One day Maicalepre left and never returned. That's why everybody thinks something bad happened to Maicalepre, and why the Kobolds and Zog assume Maicalepre's treasure is now theirs.

ZOG THE RED DRAGON WYRMLING
CR: 4
Role: Brute
Type: Medium Dragon
Stats: HP 55, AC 17, Attack 19, Damage 20, Saves 17/13
Skills:
  Breath Weapon: 15 ft. cone, 2d10 fire damage, Reflex DC 15 half
  Blindsense: 60 ft.
  Immune to fire
  Vulnerable to cold

TREASURE
50000 cp, 10000 sp, 2047 gp, 140 pp, emerald (1200gp), black pearl (400gp), deep blue spined (600gp), blue sapphire (500 gp), fiery yellow corundum (800gp), other gems and precious stones (942gp),

Flametongue: this long sword adds +1 to attacks and damage rolls, and when lit it also deals 1d6 fire damage. On a critical hit it explodes with flame adding 1d10 fire damage even if the weapon is not ablaze. Once a day, the sword can blast forth a fiery ray at any target within 30 feet as a ranged touch attack dealing 4d6 fire damage on a successful hit.

D13 - DRAGON'S LAIR TUNNEL
Through this large tunnel Maicalepre could have access to the crevasse and to get outside the mountain. Zog uses it for the same reason, despite it being able to also use any other passage. Area D13 is the most likely to be used though.

The rough walls are marred by scorch marks, and the air is thick with the stench of burnt flesh and sulfur. Strewn across the floor are the bones of animals and the charred remains of unfortunate creatures.

This tunnel is 10 feet wide and high, suitable for a Large creature to pass easily. If the characters talk or make any loud sound, Zog is alerted by their presence and he prepares an ambush.

D14-D16 - KOBOLDS' LAIRS
Deep within the kobold lair lies a small sleeping chamber. Beds made of straw and hides line the walls, along with scattered belongings. However, the room is unusually quiet, with only the sound of labored breathing breaking the silence. In one bed lies a sick kobold, its frail form a stark contrast to the usual bustling activity of the lair.

This is a common room for the Kobolds where normally they would be found, but this is a special occasion. Preys are in the complex, so all the kobolds are around, and none could be found here, but a sick kobold lying in bed. The kobold is not able to fight, and barely able to speak. It speaks draconics only.

From rooms D15 and D16, small and tight passages bring out of the mountain. These entrances are well hidden and typically closed. At each of the entrances, 2 kobolds stand guard and have a device to alert the complex like the one found outside of area 1.

D17 - THE CANAL
This canal connects the pit in area 4 to the sinkholes in area 2.
It's 4 feet deep, only 1 feet remains above the water up to the ceiling. While walking towards below are 2, the level of the water starts to lower as the floor rises. The area right below the sinkholes has only a few inch of water. A small creature can easily pass through one of the sinkholes, while a medium creature needs to squeeze. Regardless the size, everyone passing through the sinkhole will be covered in kobold droppings. The sinkholes are just 10 feet from the floor.

U18 - UPPER KILL ROOM
This is where the kobolds store all their weapons and their stock of acidic fire. They have slings, bows, shortswords, some longswords, and spears, all scattered around on the border of the room, i.e. the lower part. The room floor corresponds to the dome of Room 9, thus it is hemisperical, but there are protrudences that help the kobolds climb to the best spot and stash enough vials of acidic fire and projectiles for them to have fun.

Any explosion happening in this room makes the ceiling collapse. If the ceiling collapses, all kobolds inside are dead, and it causes 3d8 bludgeoning damage (DC 18 Reflex Save) to all the creatures underneath it.

U19 - THE LABORATORY
This is the alchemy laboratory where the acidic fire is produced.

Entering the chamber, your party is enveloped in a haze of potent odors and crackling energy. Bubbling cauldrons and shelves of mysterious ingredients create a scene of organized chaos. At the center, a workstation hums with activity, surrounded by glassware and flickering burners. The air tingles with the promise of alchemical fire, leaving your party both intrigued and wary of the secrets that lie within.

Inside here a lone kobold is brewing the alchemical fire. If the characters enter and threaten him, he casts a fire bolt at the stash of acidic fire, causing an explosion that deals 2d6 fire damage and 2d6 acid damage to each creature in the room. The explosion causes the debris to occlude both exits, and water starts pouring inside. The water fills the room in 5 minutes.

If the character destroy the ceiling, it gives way to a natural pool inside the mountain but outside the complex of the kobolds.

The complex gets flooded, and they can manage to get to the surface swimming for 3 rounds.
If they become unconscious but the ceiling is destroyed, they are brought up to the surface.

KOBOLD (CASTER)
CR: 1/4
Role: Skirmisher
Stats: HP 2, AC 13, Attack 18, Damage 4, Saves 15/11
Ability DCs: Primary 11, Secondary 8
Skills: Light Sensitivity, Cantrips (fire bolt, ray of frost, acid splash)

TREASURE
30 vials of acidic fire, a scroll of power word kill, a scroll of fireball.

CONCLUDING THE ADVENTURE
This adventure can be completed in one, two or three sessions depending on how long your typical session is. It would be advisable to run it in multiple sessions because this gives you the opportunity to award Experience Rolls to the characters, potentially improving their chances. Gauge how many XR you want to award between each session, but a good number could be between 3 and 5. If you feel that your characters are underpowered for the dangers of this dungeon, you can award even 10. There is not a right answer.

The adventure is concluded when the characters are out of the kobolds' lair, and the dragon is slain. If the characters flee the kobolds won't follow them, preferring to use their resources to improve or repair their lair. The dragon, on the other hand, will chase the characters if they flee without having him slain, especially if they stole something from its treasure. This dragon is primarily driven by emotions, and it won't care about its own safety if he wants vengeance from the characters.

Thus, the character will have to overcome the challenges of the kobolds, get to the dragon's lair and fight the dragon to retrieve their loot, and most importantly escape the complex. Unless they find a way to shrink themselves, the only easy way out is the way they came in.

The character suggested here are focused on fighting and exploration. Your group might be more incline to tackle it socially. Although not likely in this specific adventure, there is always the possibility to talk your way out of a bad situation. Keep that in mind.

CHARACTERS
Here we propose 5 characters that might cover all the roles in a typical fantasy TTRPG party, but they have a certain twist to it. The point that we want to make is that with this system you can make characters that would not be feasible with class-level-based systems. Or they could be made but not early on. Here you have extreme customization to make the weirdest things that come to mind, while you could still follow the traditional path if you want.

The physical details are intentionally left to the player.

GALABAUT (Human) - Download PDF
Galabaut can traditionally be seen as a sorcerer or a wizard, but it can fight with a sword and cure wounds.

LARELAL (Elf) - Download PDF
Larelal is a straightforward archer, but with some tricks in his sleeve.

ASTARAK (Human) - Download PDF
Astarak is a fighter, but also knows some melee spells to help him in a fight.

BOBMUR (Dwarf) - Download PDF
Bobmur does not fall into any traditional class. They're big, fight with weapon and bare hands, they can enter a state or rage, and they can get even bigger, but they are easy to hit.

MR FENNIL (Halfling) - Download PDF
This guy does not hit hard, but it can sure go places unnoticed.


Back to SRD Index